Just as Illustrator offers you the ability to change the style attributes of items in your document through its user interface, Scriptographer allows you to change them through code.
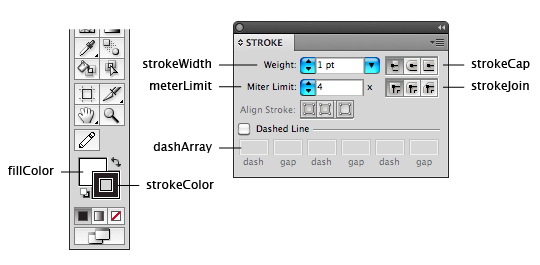
The following image shows Illustrator's style panels and the corresponding Item properties in Scriptographer:
Before We Start
Whenever you create new items in a script, it will inherit the currently active style properties of the document.
For this tutorial, to avoid confusion, we will turn off the active fill and stroke colors in the Illustrator toolbar:
Example Path
For the examples in this tutorial we will be using a checkmark shaped path which we create using the following code:
var myPath = new Path();
myPath.add(new Point(20, 70));
myPath.add(new Point(40, 100));
myPath.add(new Point(100, 20));
Executing the code above will create the following path with no fill or stroke:

To find out how to create paths with Scriptographer, please read the Working with Path Items tutorial.
Stroke Color
To add a stroke to our path, we need to set its strokeColor property.
The following example shows how to set the stroke color of the path we created earlier to the color red, using a hexidecimal string (Also known from HTML CSS Styles):
var myPath = new Path();
myPath.add(new Point(20, 70));
myPath.add(new Point(40, 100));
myPath.add(new Point(100, 20));

myPath.strokeColor = '#ff0000'; // red

Depending on the color settings of your document the string is converted internally to either a CMYKColor or an RGBColor object.
The color can also be set using an RGBColor object directly. In the following code we set an RGB color with 50% red, 0% green and 50% blue:
var myPath = new Path();
myPath.add(new Point(20, 70));
myPath.add(new Point(40, 100));
myPath.add(new Point(100, 20));

myPath.strokeColor = new RGBColor(0.5, 0, 0.5);

Whereas in Illustrator component color values range from 0 to 255, in Scriptographer they range from 0 to 1.
When you want to use a CMYK color you can work in the same way using the CMYKColor object:
myPath.strokeColor = new CMYKColor(0, 1, 1, 0); // 100% magenta and yellow
Colors are automatically converted to the current Color Mode of the document. This means for example, that when you set the stroke color of an item in an RGB document to a CMYKColor, the color is converted internally to an RGBColor.
Fill Color
Fill color works exactly the same way as stroke color. In the following example we will create a path with a red fill color:
var myPath = new Path();
myPath.add(new Point(20, 70));
myPath.add(new Point(40, 100));
myPath.add(new Point(100, 20));

myPath.fillColor = '#ff0000';
Swatches
You can also use one of the swatches in your document to give an item a stroke or fill color.
A Swatch is a named color, tint, gradient or pattern. The swatches associated with a document appear in the Swatches panel. When you hover over them with your mouse, you can see their names.
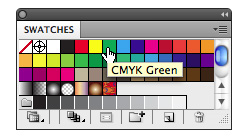
In Scriptographer we can access the swatches through their name using document.swatches. In the following example we create a path and assign it a fill color using the one of the standard swatches called 'CMYK Green':
var myPath = new Path();
myPath.add(new Point(20, 70));
myPath.add(new Point(40, 100));
myPath.add(new Point(100, 20));

var greenSwatch = document.swatches['CMYK Green'];

myPath.fillColor = greenSwatch.color;

Stroke Width
To change the stroke width of an item, you can change its strokeWidth property.
In the following example we give the path a red stroke of 10 pt:
var myPath = new Path();
myPath.add(new Point(20, 70));
myPath.add(new Point(40, 100));
myPath.add(new Point(100, 20));

myPath.strokeColor = '#ff0000';

myPath.strokeWidth = 10;

Stroke Cap
To change the shape of the start and the end of a path, you can change its strokeCap property to either 'round', 'square' or 'butt':
var myPath = new Path();
myPath.add(new Point(20, 70));
myPath.add(new Point(40, 100));
myPath.add(new Point(100, 20));

myPath.strokeColor = '#ff0000';
myPath.strokeWidth = 10;

myPath.strokeCap = 'round';

Stroke Join
To change the shape of the corners in a path, you can change its strokeJoin property to either 'miter', 'round' or 'bevel':
var myPath = new Path();
myPath.add(new Point(20, 70));
myPath.add(new Point(40, 100));
myPath.add(new Point(100, 20));

myPath.strokeColor = '#ff0000';
myPath.strokeWidth = 10;

myPath.strokeJoin = 'round';

Dashed Stroke
To create a dashed stroke, you can change the dashArray property of an item. The following code produces a dashed stroke with a 3 pt dash, 3 pt gap, 5 pt dash and a 3 pt gap:
var myPath = new Path();
myPath.add(new Point(20, 70));
myPath.add(new Point(40, 100));
myPath.add(new Point(100, 20));

myPath.strokeColor = '#ff0000';
myPath.strokeWidth = 5;

myPath.dashArray = [3, 3, 5, 3];

The PathStyle Object
Every item also has an item.style property which is an object containing only style properties.
We can use this to copy the style properties of one item to another. The following example first creates a circle shaped path and assigns it a stroke color. Then another circle shaped path is created and we assign it the style of the first path:
var firstPath = new Path.Circle(new Point(50, 50), 50);
firstPath.strokeColor = '#ff0000';
console.log(firstPath.strokeColor); // { red: 1, green: 0.0, blue: 0.0 }

var secondPath = new Path.Circle(new Point(100, 50), 50);
// secondPath doesn't have a strokeColor yet:
console.log(secondPath.strokeColor); // null

// Apply the style of firstPath to that of secondPath:
secondPath.style = firstPath.style;

// Now secondPath has the same strokeColor as firstPath:
console.log(secondPath.strokeColor); // { red: 1, green: 0.0, blue: 0.0 }
The item.style property also comes in handy for setting multiple style properties in one go.
In the following example we create an object containing a number of style properties and pass it to the item's style property to set them all in one go:
var myStyle = {
	strokeColor: '#00ffff',
	fillColor: '#000000',
	strokeWidth: 50
};

var myCircle = new Path.Circle(new Point(100, 100), 50);
myCircle.style = myStyle;
Removing Styles
To remove any kind of path style, just pass null to the property:
var path = new Path.Circle(new Point(50, 50), 50);

// Set the fillColor to null to remove it:
path.fillColor = null;
To remove all style settings from a path, pass null to its style property:
var path = new Path.Circle(new Point(50, 50), 50);
path.style = null;
Working with the Current Style of the Document
As I mentioned earlier, all newly created items automatically receive the currently active path style properties as defined in the Illustrator interface. We can also change these through code by using document.currentStyle.
document.currentStyle is the PathStyle object of the document and contains the currently active style properties such as fillColor and strokeColor.
The following example changes the current style of the document, then creates a path which inherits that style. Then it changes only the strokeWidth and creates another path.
// Change the current style of the document:
document.currentStyle = {
	strokeColor: '#000000',
	fillColor: '#ff0000',
	strokeWidth: 3
};

// This path will inherit the styles we just set:
var firstPath = new Path.Circle(new Point(125, 50), 20);

// Change the current stroke width of the document:
document.currentStyle.strokeWidth = 6;

// This path will have it's strokeWidth set to 6:
var secondPath = new Path.Circle(new Point(175, 50), 20);