Palette windows are windows floating on top of the Illustrator documents, offering access to options for the various tools and functions. Illustrator comes with many palette windows for Illustrator's standard functionality. Scriptographer has a convenient way to create our own bespoke palette windows to allow the customization of a tool's behavior.
Such windows are created through the new Palette(title, components, values) constructor. The components object contains descriptions of the interface components to be added to the palette. The the different types of components and their options are described in the tutorial Interface Components. The values object is optional, but a very useful way to provide the initial values to be displayed in the palette, and also a container to automatically receive changed values once the user interacts with the palette.
The values object that is passed to the new Palette(title, components, values) constructor is continuously updated whenever the user changes values in the palette, so the script can simply keep referring to that for up-to-date values.
Contact Details Example
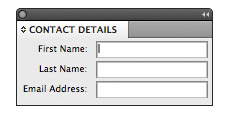
As a first example, we reuse the code from the tutorial about Prompt Dialogs and create a palette that contains three text input fields to input contact details:
// First we define the interface components
var components = {
	firstName: { type: 'string', label: 'First Name' },
	lastName: { type: 'string', label: 'Last Name' },
	email: { type: 'string', label: 'Email Address' }
};

// Now we create the palette window
var palette = new Palette('Contact Details', components);
As you can see, without changing the components definition, this just works for palette windows too. But there is an issue: Since our palette is modeless, there is nothing the palette does with these values yet. It just displays fields which can be changed by the user, for as long as the palette is visible. In order to do something with the entered values, we need a trigger for an activity. A simple possibility is the addition of a button that when clicked fires the onClick()
The different types of components available to create palette windows and their options are described in the tutorial Interface Components.
// Define the values object, declaring default values and also
// receiving the user changes, for simpler further reference:
var values = {
	firstName: '',
	lastName: '',
	email: ''
};

// Define the interface components to edit each value. Note that they
// need to use the same names as the properties in the values object:
var components = {
	firstName: { type: 'string', label: 'First Name' },
	lastName: { type: 'string', label: 'Last Name' },
	email: { type: 'string', label: 'Email Address' },

	// Define the hello button which when clicked says hello:
	hello: {
		type: 'button', value: 'Hello',
		onClick: function() {
			// The user clicked 'Hello', so let's say hello to him:
			Dialog.alert('Hello ' + values.firstName
				+ ' ' + values.lastName
				+ ', your email address is: '
				+ values.email);
		}
	}
};

// Now we create the palette window using the components
// and values definitions:
var palette = new Palette('Contact Details', components, values);
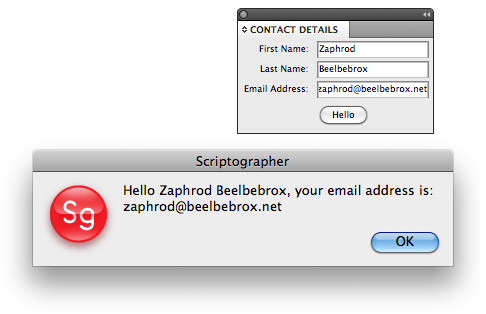
In order to work work with the values entered by the user, we now defined an object called values that we passed to the Palette constructor, as a container to take default values from and also put changed values back in for us. As mentioned before, this is a very convenient way for working with values changed in palette windows, as we simply need to refer to the values object from our code for up-to-date values.
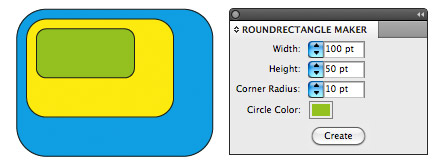
RoundRectangle Maker
Now let's make something more useful, a palette window that facilities the creation of round rectangles:
// Define the values object:
var values = {
	width: 200,
	height: 100,
	radius: 10,
	color: new RGBColor(1, 0.5, 0)
};

// Define the palette components to edit each value:
var components = {
	width: {
		type: 'number', label: 'Width', units: 'point'
	},
	height: {
		type: 'number', label: 'Height', units: 'point'
	},
	radius: {
		type: 'number', label: 'Corner Radius', units: 'point'
	},
	color: {
		type: 'color', label: 'Circle Color'
	},

	// The create button, with an onClick() handler that creates the
	// rectangle for us:
	create: {
		type: 'button', value: 'Create',
		onClick: function() {
			// Create a RoundRectangle at coordinate 0, 0, with the
			// size defined by values.widht and values.height, and
			// a corner radius of values.radius.
			// Note: The radius needs to be converted to a size,
			// as horizontal and vertical corner size is defined
			// seperately
			var path = new Path.RoundRectangle(
					new Point(0, 0), // topLeft corner
					new Size(values.width, values.height), // size
					new Size(values.radius)); // round corner size
			// Set the fill color to the color selected by the user
			path.fillColor = values.color;
		}
	}
};

// Now we create the palette window:
var palette = new Palette('RoundRectangle Maker', components, values);
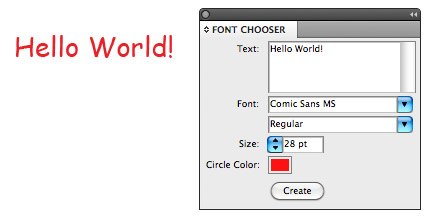
Font Chooser
This example is similar, but makes use of the font component to create a simple palette that allows us to edit a text, choose a font, size and color and then place a text item using this definition. See the tutorial X to learn more about working with text items:
// Define the values object:
var values = {
	text: 'Hello World',
	font: 'Helvetica Regular',
	size: 14,
	color: 'black'
};

// Define the palette components to edit each value:
var components = {
	text: {
		type: 'string', label: 'Text',
		rows: 4, columns: 20
	},
	font: {
		type: 'font', label: 'Font'
	},
	size: {
		type: 'number', label: 'Size', units: 'point'
	},
	color: {
		type: 'color', label: 'Circle Color'
	},

	// The create button, with an onClick() handler that creates the
	// text item for us:
	create: {
		type: 'button', value: 'Create',
		onClick: function() {
			// Create a PointText
			var text = new PointText();
			// Set content and characterStyle properties on it
			text.content = values.text;
			text.characterStyle.font = values.font;
			text.characterStyle.fontSize = values.size;
			text.characterStyle.fillColor = values.color;
		}
	}
};

// Now we create the palette window:
var palette = new Palette('Font Chooser', components, values);
Mouse Tool with Palette Window
The next example illustrates the way palette windows can be combined with mouse tools. We make a simple drawing tool of which the tool.minDistance can be changed through a palette. To learn more about mouse tools, refer to the Creating Mouse Tools tutorial.
var values = {
	minDistance: 0
};

var components = {
    minDistance: {
		type: 'number', label: 'Minimum Distance',
		units: 'point'
    }
};

var palette = new Palette('Drawing Tool', components, values);

var path;

function onMouseDown(event) {
	// Update the minDistance each time the mouse button
	// is pressed, by reading it form the values object
	tool.minDistance = values.minDistance;

	// Now create the path and add the first point to it.
	path = new Path();
	path.add(event.point);
}

function onMouseDrag(event) {
	path.add(event.point);
}
onChange() Handler
As values of interface components can change at any time through user interaction, components can define an onChange() handler that is called each time their value is changed, similar to the onClick() handler introduced earlier for button components. The handler receives the new value as the first argument. We could rewrite the above example to use such a handler instead:
var components = {
    minDistance: {
		type: 'number', label: 'Minimum Distance',
		units: 'point',
		// Define the onChange() handler which is fired each time
		// the user changes the minDistance value.
		onChange: function(value) {
			print('Minimum Distance was changed to', value);
			tool.minDistance = value;
		}
    }
};
This would then simplify the onMouseDown() handler:
function onMouseDown(event) {
	path = new Path();
	path.add(event.point);
}

The entire code of the new version then looks like this:
var components = {
    minDistance: {
		type: 'number', label: 'Minimum Distance',
		units: 'point', value: 0,
		// Define the onChange() handler which is fired each time
		// the user changes the minDistance value.
		onChange: function(value) {
			print('Minimum Distance was changed to', value);
			tool.minDistance = value;
		}
    }
};

var palette = new Palette('Drawing Tool', components);

var path;

function onMouseDown(event) {
	path = new Path();
	path.add(event.point);
}

function onMouseDrag(event) {
	path.add(event.point);
}