In this tutorial we will make a mouse tool that acts like a brush, with a variable thickness depending on speed and a sense of a natural expression.
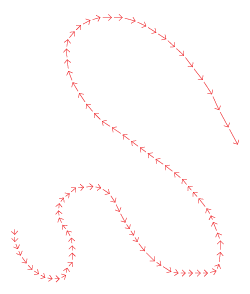
Try it out by clicking few times below:
Drawing a Line while Dragging
We'll start by making a simple mouse tool that creates a new path when you click in the document and then adds segments to it when you drag the mouse:
When you initialize and interact with the tool, it does the following:
When you initialize the tool:
- It sets the minimum amount of distance that the mouse has to move while dragging to fire the onMouseDrag(event) handler to 15 pt, by setting the value of tool.minDistance.
- It initializes the path variable, so we can access it in the onMouseDown(event) and onMouseDrag(event) handler functions.
When you press the mousebutton:
- It creates a new Path()
- It changes the path.strokeColor of the path
- It selects the path by setting path.selected to true
When you then move the mouse and drag:
- It adds a new segment to the path by passing event.point (the mouse position) to the path.add(segment) function.
// The minimum distance the mouse has to drag
// before firing the next onMouseDrag event:
tool.minDistance = 15;

var path;

function onMouseDown(event) {
	// Create a new path and select it:
	path = new Path();
	path.strokeColor = '#00000';
	path.selected = true;

	// Add a segment to the path where
	// you clicked:
	path.add(event.point);
}

function onMouseDrag(event) {
	// Every drag event, add a segment
	// to the path at the position of the mouse:
	path.add(event.point);
}
Using the Speed of the Mouse
As you can see in the video above, when the mouse is moved fast the points are further apart than when you move the mouse slowly.
Thus, the difference in position between these points describe the amount that the mouse moved and therefore also its speed.
In the Points and Vectors chapter of the Vector Geometry tutorial, we introduced the notion of a vector; an amount of distance to move in a certain direction.
You could say that all these little drag movements are vectors. The mouse handler event object includes a reference to the mouse movement vector, so we don't have to calculate it ourselves and can easily use it in our tools: event.delta
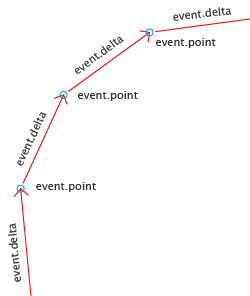
The image on the left is a zoom of the top of the image above.
- event.point is the position of the mouse
- event.delta is the vector of the mouse drag event; the distance and direction from the last mouse drag event
The Creating Mouse Tools tutorial explains the different ways to create Scriptographer tools that the user can interact with by using the mouse. Mouse Tool Events are explained in detail in the Mouse Tool Events tutorial.
Using event.delta
Next we will change our earlier script to express the speed of the mouse while drawing by drawing a skeleton around our path. The skeleton lines become larger when the mouse moves faster and smaller when the mouse moves slowly:
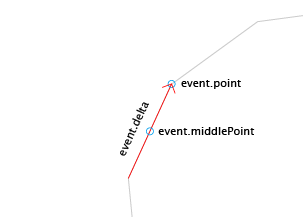
As you can see in the movie above, the skeleton lines don't start at the position of the mouse, but in the middle between the current position and the last position of the mouse.
The mouse handler event object includes a reference to this middle point, to save us from calculating ourselves: event.middlePoint
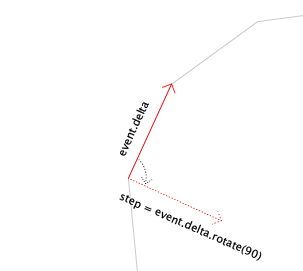
We take event.delta (the vector in the direction of the mouse) and rotate it by 90 degrees. This means that the vector which was previously pointing in the direction of the mouse, is now pointing 90 degrees away from the direction of the mouse.
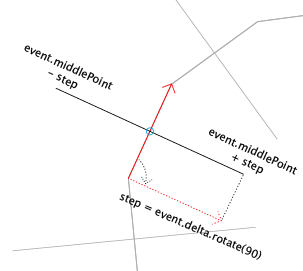
When we add the rotated delta vector to an absolute point (event.middlePoint in this case) we get back the position offset by the direction and length of the vector.
Here is our updated tool script that now also creates the skeleton paths. The new lines of code are highlighted:
tool.minDistance = 15;

var path;

function onMouseDown(event) {
	path = new Path();
	path.strokeColor = '#00000';
	path.selected = true;

	path.add(event.point);
}

function onMouseDrag(event) {
	path.add(event.point);

	var step = event.delta;
	step.angle += 90;

	var top = event.middlePoint + step;
	var bottom = event.middlePoint - step;

	var line = new Path();
	line.strokeColor = '#000000';
	line.add(top);
	line.add(bottom);
}
Lets look at the code that was added to create the skeleton paths:
First we create a variable called step and reference event.delta (the vector of the mouse movement) in it. We rotate this vector by 90 degrees by adding 90 to the point.angle of step:
var step = event.delta;
step.angle += 90;
Then we find the two positions of our skeleton path by adding and subtracting our rotated vector to event.middlePoint. Even though we call these two positions top and bottom, the position of these points depends on the direction of the mouse. We just name them this way, so we can have a mental picture of where they are in relation to each other:
var top = event.middlePoint + step;
var bottom = event.middlePoint - step;
Next we create a new path, change its stroke color and add the top and bottom points to it:
var line = new Path();
line.strokeColor = '#000000';
line.add(top);
line.add(bottom);
Using the Skeleton Points to Make a Body around our Line
Next we will make another path which we add the skeleton points to each time the tool.onMouseDrag handler function is called. The new lines of code are highlighted:
Here is our updated code:
tool.minDistance = 15;
tool.maxDistance = 45;

var path;

function onMouseDown(event) {
	path = new Path();
	path.strokeColor = '#00000';
	path.selected = true;

	path.add(event.point);
}

function onMouseDrag(event) {
	var step = event.delta;
	step.angle += 90;

	var top = event.middlePoint + step;
	var bottom = event.middlePoint - step;

	var line = new Path();
	line.strokeColor = '#000000';
	line.add(top);
	line.add(bottom);

	path.add(top);
	path.insert(0, bottom);
}
Now lets look at the code that has changed since the last version:
By setting tool.maxDistance to 45, the onMouseDrag event handler will be called repeatedly until the distance between the event point and the mouse is less than 45:
tool.maxDistance = 45;
As you can see in the movie above, we are no longer drawing the line that follows our mouse by adding toolEvent.point to the path variable. Instead we add the top and bottom points to it. Since we want to be able to fill the path with a color, we need to add the top point to the end of the path and the bottom point to the beginning of the path. To add a point to the start of a path, we use path.insert(index, segment) and pass it 0 for the index:
path.add(top);
path.insert(0, bottom);
Smoothing and Coloring the Body
Now we will smooth the path and fill it with a random color from our document's swatches list:
Here is the updated script, with the new lines of code highlighted:
tool.minDistance = 15;
tool.maxDistance = 45;

var path;

function onMouseDown(event) {
	path = new Path();
	path.fillColor = document.swatches.pick().color;

	path.add(event.point);
}

function onMouseDrag(event) {
	var step = event.delta / 2;
	step.angle += 90;

	var top = event.middlePoint + step;
	var bottom = event.middlePoint - step;

	path.add(top);
	path.insert(0, bottom);
	path.smooth();
}

function onMouseUp(event) {
	path.add(event.point);
	path.closed = true;
	path.smooth();
}
After creating the path in the onMouseDown event handler function, we fill it with a color by changing it's path.fillColor property. To find a random swatch in the document.swatches array, we use a function called pick(). (This function is not standard javascript, but is available to all arrays in Scriptographer.) We then pass the swatch.color property of the random swatch to the path.fillColor:
path.fillColor = document.swatches.pick().color;
To smooth the path, we call path.smooth() every time we add one or more points to the path.
You can found out more about the path.smooth() function in the Smoothing Paths section of the Working with Path Items tutorial.
We smooth our path in the onMouseDrag event handler function:
path.smooth();
And also in the onMouseUp function:
path.smooth();
Adding Brush Stroke Ends
tool.fixedDistance = 15;

var path;
var strokeEnds = 6;

function onMouseDown(event) {
	path = new Path();
	path.fillColor = document.swatches.pick().color;
}

var lastPoint;
function onMouseDrag(event) {
	// If this is the first drag event,
	// add the strokes at the start:
	if(event.count == 1) {
		addStrokes(event.middlePoint, event.delta * -1);
	} else {
		var step = event.delta / 2;
		step.angle += 90;

		var top = event.middlePoint + step;
		var bottom = event.middlePoint - step;

		path.add(top);
		path.insert(0, bottom);
	}
	path.smooth();

	lastPoint = event.middlePoint;
}

function onMouseUp(event) {
	var delta = event.point - lastPoint;
	delta.length = tool.maxDistance;
	addStrokes(event.point, delta);
	path.closed = true;
	path.smooth();
}

function addStrokes(point, delta) {
	var step = delta.rotate(90);
	var strokePoints = strokeEnds * 2 + 1;
	point -= step / 2;
	step /= strokePoints - 1;
	for(var i = 0; i < strokePoints; i++) {
		var strokePoint = point + step * i;
		var offset = delta * (Math.random() * 0.3 + 0.1);
		if(i.isEven()) {
			offset *= -1;
		}
		strokePoint += offset;
		path.insert(0, strokePoint);
	}
}